
So I had a hand in the other day and mounted my work on some foam board, as did other people. So there's all these offcuts of foam board floating around in the studio, so I thought rather than throw it all in the bin I'd take some of the bigger pieces with me to make some print blocks.

Stage One: Draw your design on the print board.

Stage Two: Use a scalpel to remove all the areas that are white (or a sharp pencil if they are really small).

Stage Three: Apply ink and then print. This first one I turned the block upside down onto the paper and then put a book on it and pressed down. It didn't work so well.

This one I put the paper on top, then a book then pressed down. As you can see that worked a fair deal better. But not well enough. Keep trying.

This one is just paper on top and pushed down with a finger to make sure it gets all the sections printed. Worked much better. It might be the technique or just the fact that the inks now layered up thick and not soaking into the board, but either way.

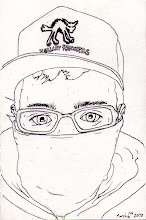
Same technique as before but using deep red ink. The blacks come through from before but I really like the mix that its made. Printing. Done. This was really fun to make and I love the outcome. Definitely going to do a few more of these on the other offcuts i've got.

The board after printing. Looks pretty good on it's own.
No comments:
Post a Comment